
During August the amazing team at @sewover50 explored the theme of sustainability in sewing. This got me thinking about different ways to stay within the sustainable banner but also stay up to date with the latest fashion trends, though this is not something I am particularly known for my daughter asks me to make her garments occasionally. So I Googled fashion trends autumn 2021 and the first thing I encountered was the Sweater Vest. Now that was something that I think I could have fun with.
I decided to approach it from two different stand points, sewing off-cuts and refashioning and I am pretty pleased with how both went. Lets start with creating a sweater vest from off-cuts.
The fabric I chose for this project was a black and white double knit which I bought from The Fabric Godmother in January 2018. I have already made a Wendy Ward Kinder Cardigan from it, which has been regularly worn since it was made, and I had a small piece left over which would be ample for a sweater vest.

Next task was to sort out a pattern, so another Google search brought up an image of a wrap around knitted roll neck top, which not only did I love, as it was a bit different, but was also something that I thought the concept could be adapted into a pattern that would be easy to draft. So I sat down with a cup of tea, notebook and pencil and this is what I came up with.
The drafting of this pattern is straightforward. I took 13 easy (and not necessarily that accurate) measurements and using a ruler, all straight lines not a curve to be seen, drew out the pattern and that was that.
These are the measurements I took for the front and back pieces.
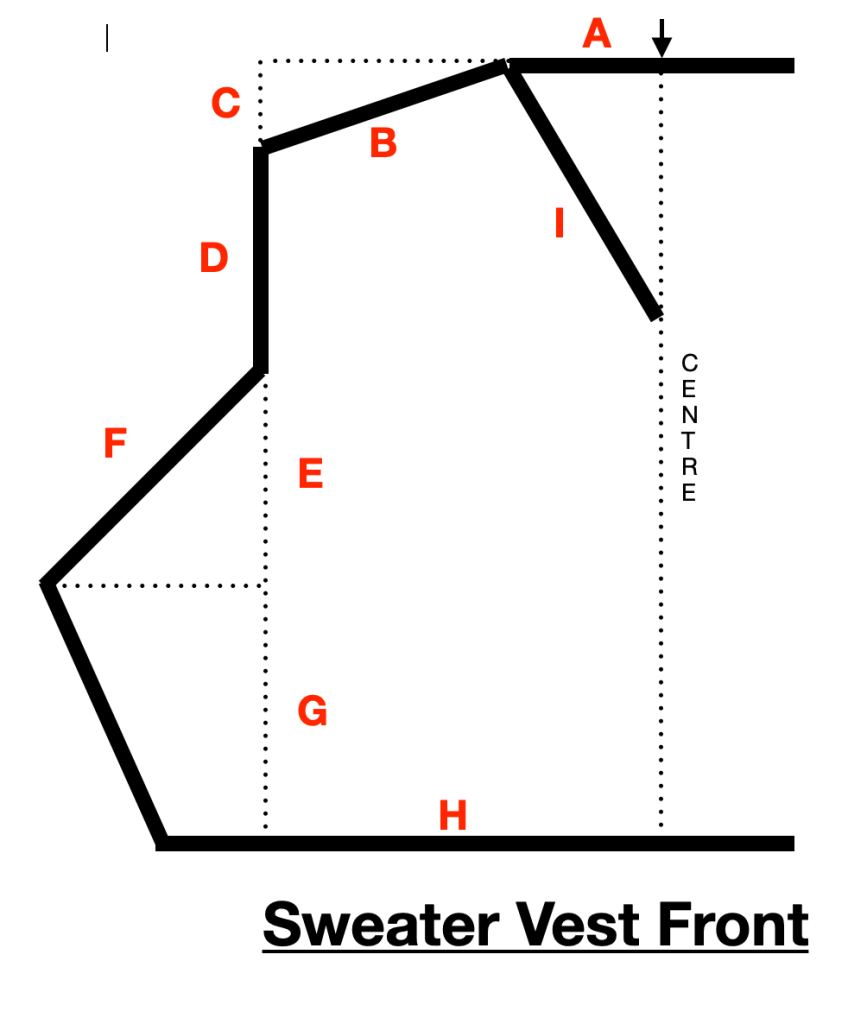
A – The distance through the neck shoulder to shoulder. Half this distance will be A.

B – The distance from the neck to the shoulder.
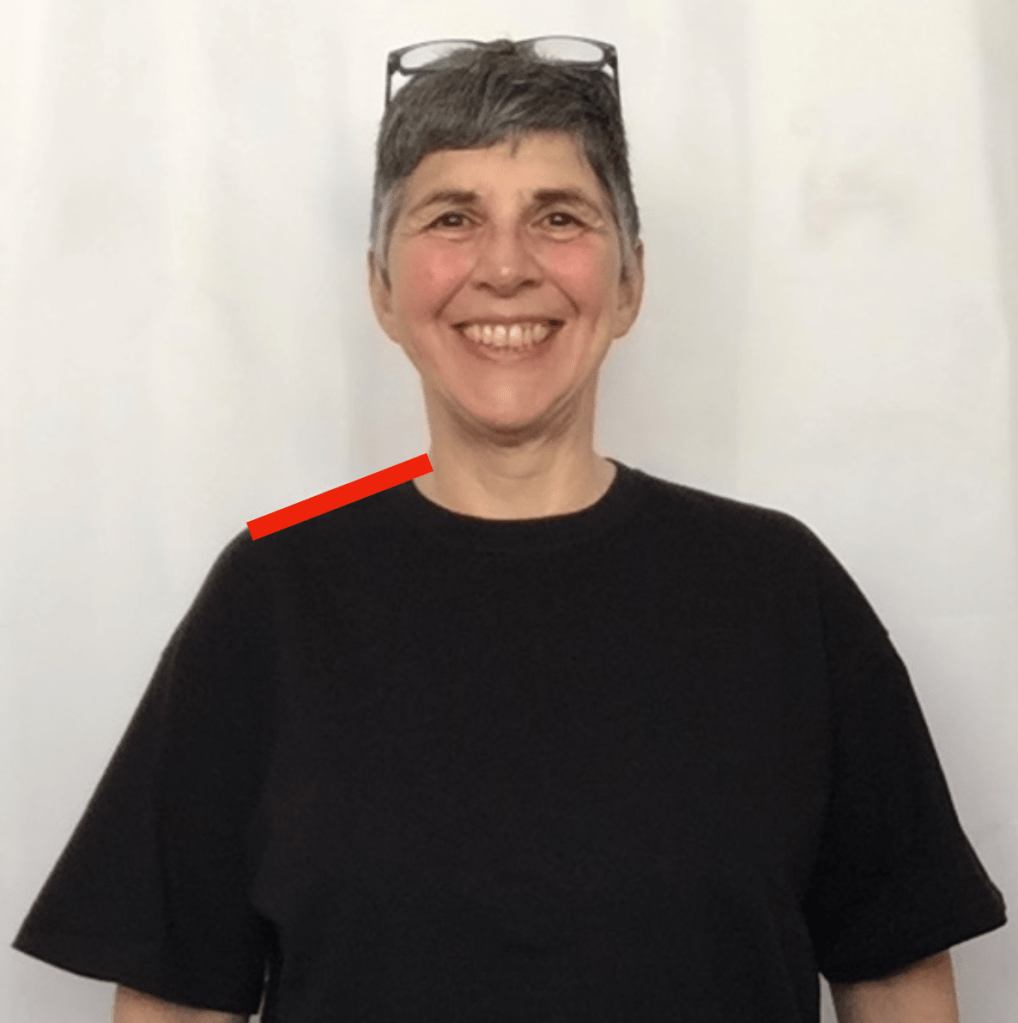
C – The distance the shoulder drops. I used my Jenerates sewing ruler to measure the drop in my shoulder.

D – The distance from the shoulder to the under arm. Again I used my Jenerates Sewing Ruler to show where my under arm is.

E – Mark where you want the point of the sweater vest to come and then measure straight down from the under arm to this point line.

F – Measure from the under arm to the point.

G – Measure from the point line to the hem.

H – Measure from the side seams left to right to establish the hem width. Half this figure will be H.
I – Measure from the side of the neck to where you would like your V neck to end.

Use these figures to draft your front pattern piece.
Then on to the back.

A – Measure across the back of your neck shoulder to shoulder. This measurement should be slightly bigger than the corresponding front measurement. Half this measurement will be A.
B – This will be the same as the measurement for the front.
C- This will be the same as the measurement for the front.
D – Measure around the back from the shoulder to the underarm. This measurement should be slightly bigger due to the curve of the shoulder blade.
E – This will be the same as the measurement for the front.
F – This will be the same as the measurement for the front.
G – This can be the same as the measurement for the front but I decided to make the back longer on my sweater vest.
H – Measure from the side seam left to right around the back to establish the width of the hem. Half this figure will be H
Use these figures to draft your back pattern piece.
Dont’t forget that you will also need to add a seam allowance to these pattern pieces. I added a 1/2″ seam allowance due to the construction method I was going to use which I will detail below.
Now that the pattern had been drafted I had to start thinking about the construction of the sweater vest. As this was a knit fabric I would need to stabalise the seams and edges to stop them from stretching. I decided to go full out twill tape overlocked seams and edges using my Juki 654de . As the twill tape was 1/2″ wide that was the seam allowance I went for. The tape could be over locked in place along the edge and then folded on the inner edge, no further measurments or trimming of seams would be needed.

Construction of the sweater vest was fairly quick as apart from the V neck everything else is an outside edge.
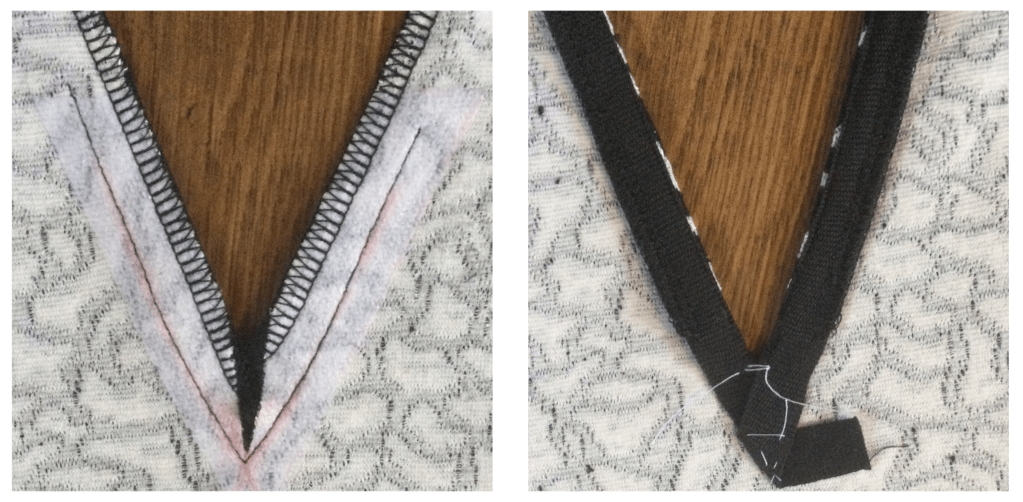
Starting with the V, I added a 3/4″ V of fusible interfacing and stay stitched along the 1/2″ seam line. I reduced my stitch length for added stability and also engaged the walking foot on my Juki NX7 , something that is always a good idea when working with knitted fabrics.
I then snipped down to the stitch line, this allowed me to sew the twill tape in two pieces to the neck line.

Over lock the twill tape along the outside edge of the neck line and then top stitch the inside edge of the twill tape down. This will act as a row of under stitching. Turn the twill tape to the inside and stitch down, I basted the point where the twill taped crossed over to get a crisp point. If you want you can always create a facing for the neckline, a much easier method, I just fancied giving this method a try.
Stitch the shoulders and then over lock the seam allowance together including more twill tape to stop them stretching. At the same time you will add twill tape to the back neck so the over locking can be done in one run. However, as when sewing we always like to eliminate bulk whenever possible, I set the tape up in 3 pieces along the back piece, with a gap where the neck facing is. Over lock the edge and then fold the seam allowance to the back and top stitch in place.

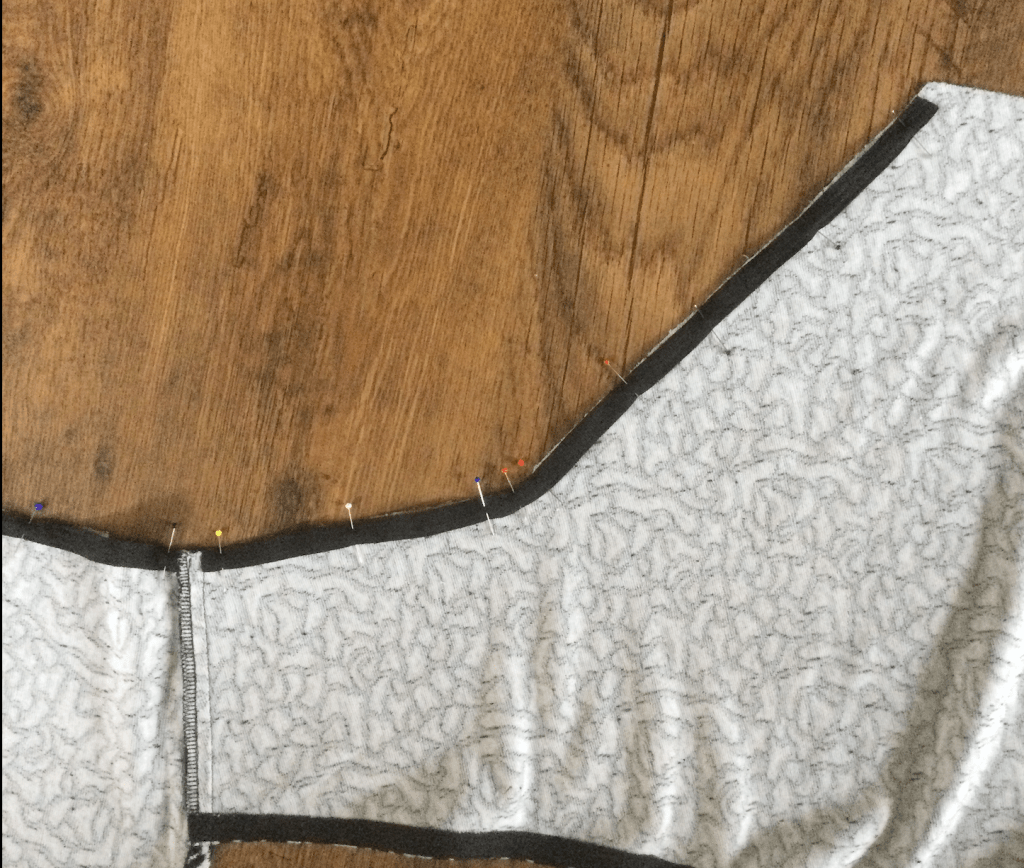
The same process is followed for the outside edge of the sweater vest, over lock the twill tape in place, avoiding areas of bulk, shoulder seam and the side point. I did not worry about making a sharp turn on the underarm corner, I just eased the twill tape around and then steamed the tape to shrink the inside area flat. When all the twill tape has been attached turn the edge in and top stitch the sides, once again I just eased the underarm corner round instead of trying to get a sharp corner.


I did not use twill tape in the hem, I just over locked the edge, and turned under and top stitched.
Once the sweater vest was all edged and tidy I next needed to decide where to add the buttons. This is a bit awkward on your own, so if you have a friend to help you pin the points in place that would be handy.
Initially I was going to have the points on the front of the sweater vest, but just playing about with the position I decided I preferred it pointing to the back.
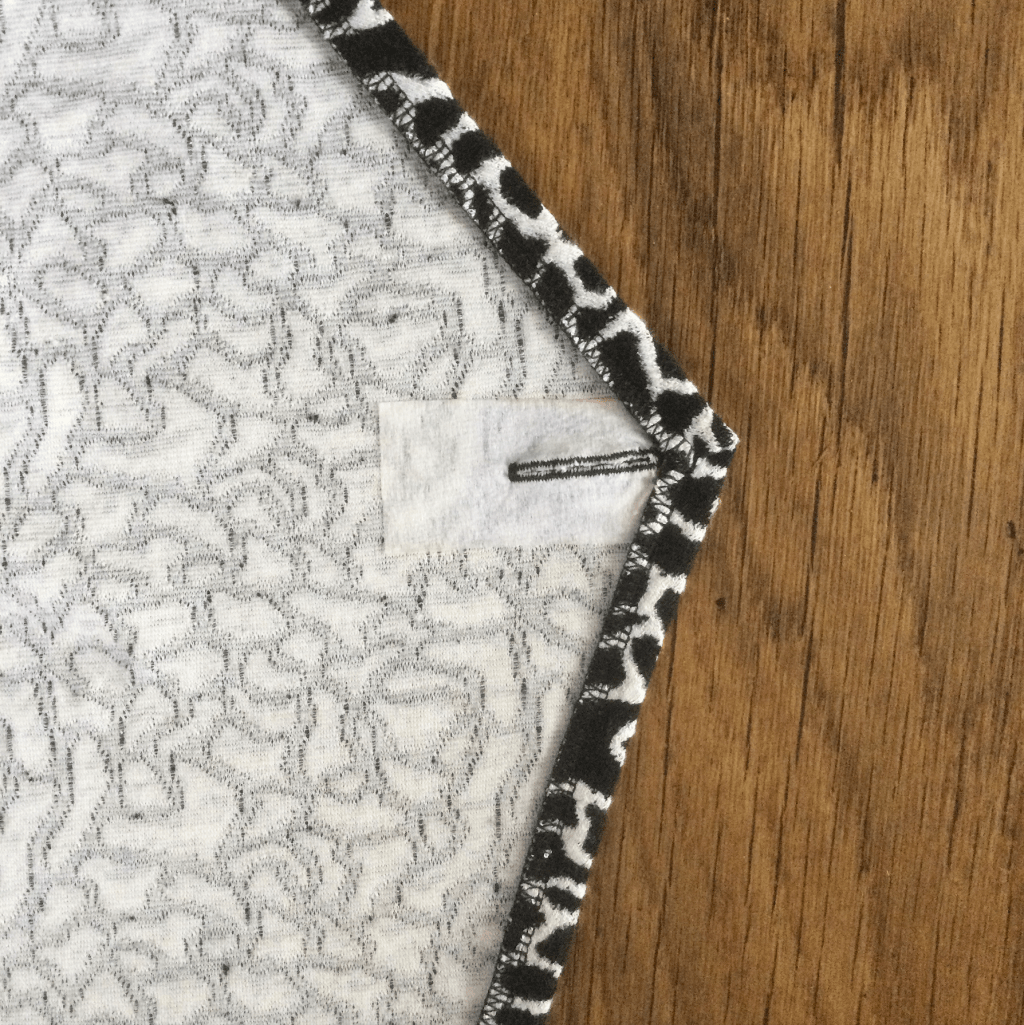
Many people have said, and I am one of them, that the buttonhole function on the Juki NX7 is second to none. I still get the butterflies in my stomach when I think about automatic buttonholes in my completed garment going wrong, but with the NX7 they never have. I added a piece of interfacing on the back of the point, set the machine up and off it went. Two perfect button holes in a stretch knitted fabric, no bother.
So the button holes are done, buttons sewn on, I added a small piece of interfacing to stitch the buttons in to too just for added strength, and the inside point discreetly sewn to the inside front and my new sweater vest is completed.


As I always say this is my version and it is there for you to make it your own. It is a very basic shape that can be played with. Instead of using the full measurement at the hips make the hem narrower so the cross over is more visible. Use two different fabrics or more if you are in a patchwork mood. You could even ditch the wrap-over and points all together and create a side seam. If you do use this pattern as a starting point for your own design please send me a picture, I would love to see what you do with it.
Next up – part 2 The Refashion.

Wow! You’ve taken refashioning to a whole new level with this one! Am not a vest fan, but there’s a lot of info in this that can be used for other designs. Great posts (including the second part/post)!
LikeLiked by 1 person
Thank you, I am so pleased you found it interesting and that there are bits you can take away and put in to your own projects.
LikeLiked by 1 person