
I have a problem, that problem is I want to sew everything that it is possible to sew. That is why when I saw the @sewcialists post on Instagram about their upcoming #allchestswelcome in August 2020 I saw an opportunity to finally concentrate on one project that has been on the back burner for over 2 years – making my own hook and eye closures for my hand-made bras. A year on and with a few tweaks I thought I would re-post on my own blog as it is still something I enjoy making and I believe ups the game on bra making.
Initially my motivation for wanting to make them was seeing hook and eye closures that matched the cup fabric on a bespoke bra-making website. Oh my, as makers we all love that little detail that elevates our hand-mades that one little notch and for bras here was mine.
Another issue I was having was the quality of shop bought closures. I was finding that the ones I bought were made from what appeared to be a plastic based fabric and had been heat cut in the manufacturing process. This left a sharp edge top and bottom that drove me mad when I was wearing them.
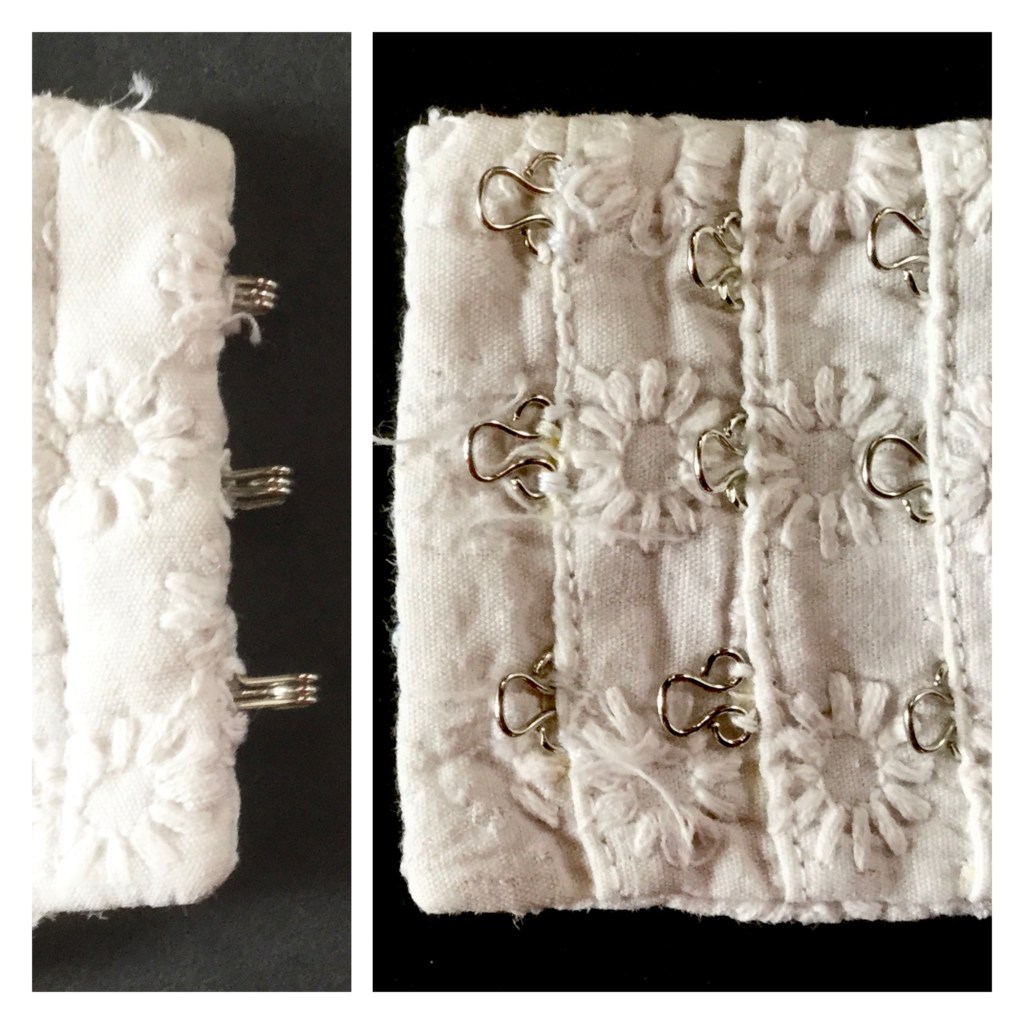
So three years ago I bought a pattern, I followed the instructions, I made, I wore, I was disappointed. Here is the first, and up to that point only, hook and eye closure I had made. Yes it looks bad, no it doesn’t quite do the job it should, yes I have tried to fix it, yes I am embarrassed and yes I really wanted to get this sorted.
I became even more determined to get this project up and running when I started reading through the comments on the original #allchestswelcome post. I didn’t realise all the issues that people were having with bras and their need to make their own as their specific issues are not addressed by big brand bra makers. One comment that stood out spoke about allergies and that was it. I messaged the Sewcialists and offered to do a blog on how I finally got this sorted, or not.
At the moment I am very happy with how things have gone. It took a few attempts to get to a version that I was happy with along with a method that was consistently producing a good item. As I always say in my blogs, the method I have used is my method and is not necessarily the correct way. It is there for you to adapt and change to however works best for you. I hope the information in this post will be sufficient for you to give it a try for yourselves but if you have any questions please ask.
So let’s get going.
Materials
The tools and materials I used for the hook and eye closures are:
- Fabric
- White medium interfacing – I have specified white for a reason which I will talk about later.
- Fabric pencil, chalk marker and a normal lead pencil
- Ruler
- Tweezers – I found them invaluable for picking up and placing the hooks and eyes
- 1/4” double sided quilters tape
- Size 2 hooks x 3 and eyes x 9
- A standard foot for your machine
- A button foot for your machine
- A zipper foot for your machine
- Thread
- Pattern

Cutting and Preparing the Fabric and Interfacing
The pattern has developed as I have been testing my construction methods and wearing the finished product. Hopefully you will be able to create your own from the diagrams below.


These are the patterns for the main fabric.
For the interfacing for the main piece, remove the 3/8” hems from both ends and the 1/4” seam allowance from each of the long sides. The markings for the main piece are as above.
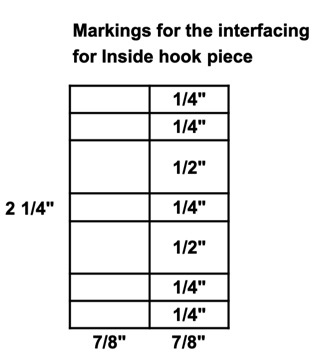
For the interfacing for the hook piece remove the 3/8” from the bottom only and the 1/4” seam allowance from each side. The markings for the inside hook piece are

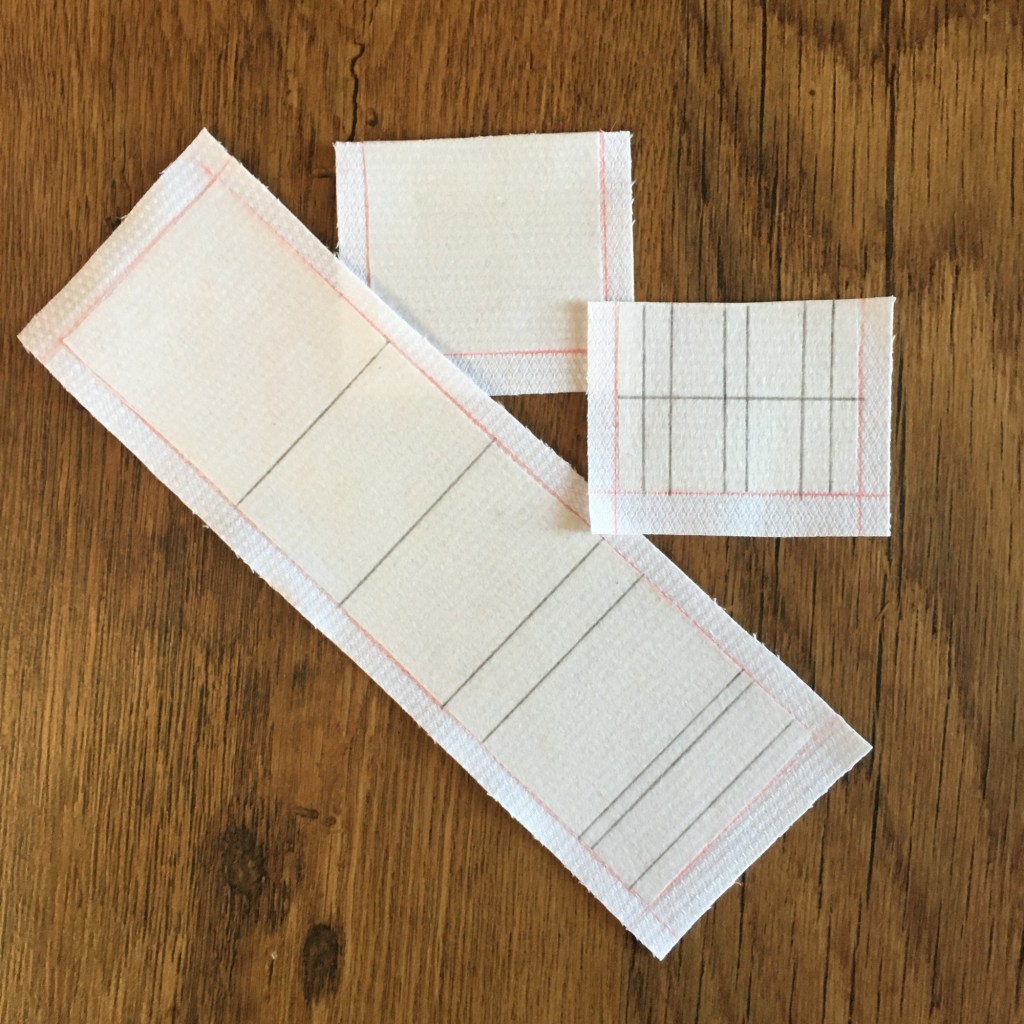
Start by cutting out your main fabric pieces, x1 for the main/eye piece and the two hook pieces. For correct placement of the interfacing I mark the 1/4” seam allowance on the long edges and 3/8” fold allowance on the short edges on the main piece and 1/4” seam allowance on the short edges and 3/8” fold allowance on one long edge only on the hook pieces.
Cut out the interfacing pieces and attach to the main fabric, inside your markings.

The next stage is to mark up the pieces with the folding, sewing and placement lines using a fabric pencil following the notches on the pattern.
Making the Eye Piece
With the main piece fabric side down and the blank area at the top we will start to fold the fabric to create the pockets for the eyes to sit in. To do this fold the fabric under at the second line from the bottom (right sides together) then fold the bottom (small) piece of fabric back so the fold sits on the first line.
Repeat this for the 4th line folding down to meet the 3rd and the 6th line to meet the 5th. Turn over and press well. All the pockets for the eyes are now created.

The eyes can now be inserted and fixed into the pockets. This can be done in any order that you like.
To do this attach the button foot on to your machine. If your machine does not have a specific button stitch use a zigzag and disengage your feed dogs.
Start by adding a strip of quilters tape to the inside of the fold just down from the edge. Now using the marks on the interfacing of your inside hook piece, position the eyes in the pocket leaving approximately 1/8th” of the eye proud of the fold.

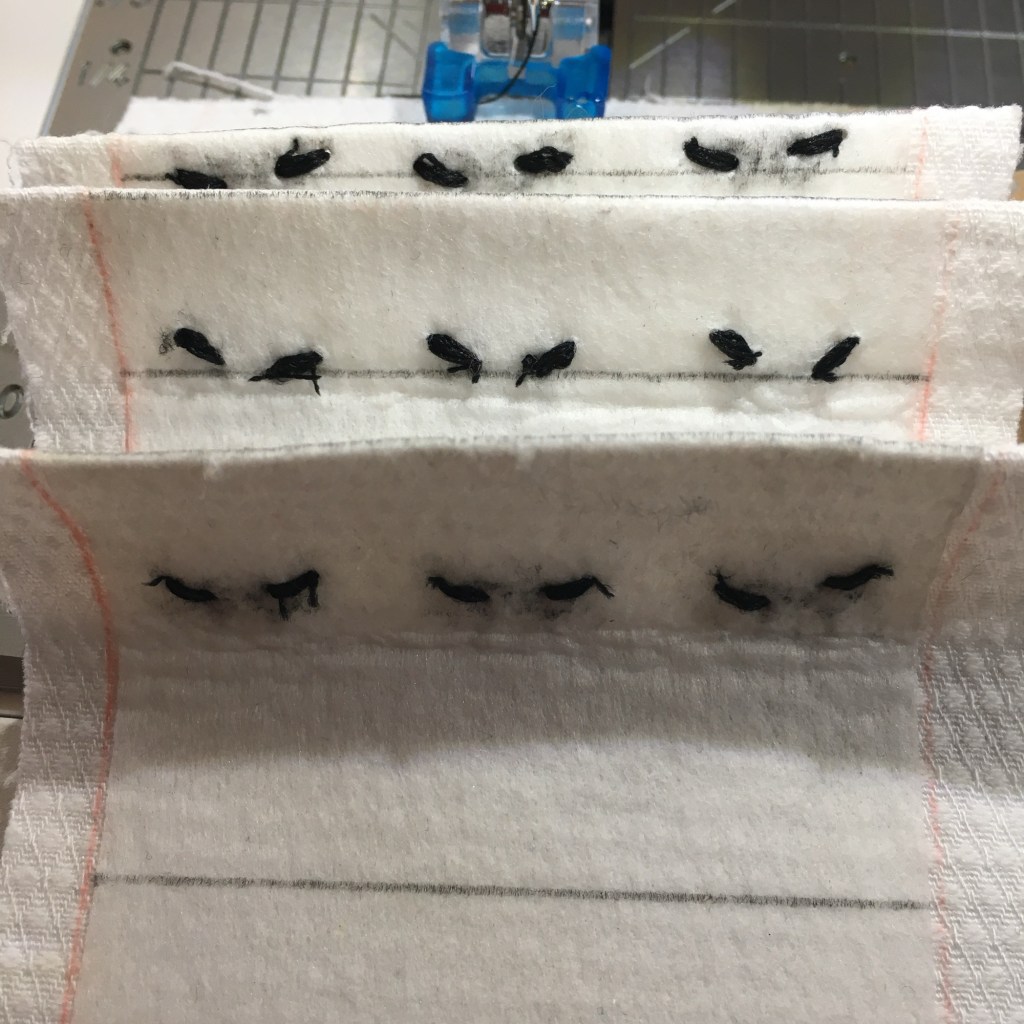
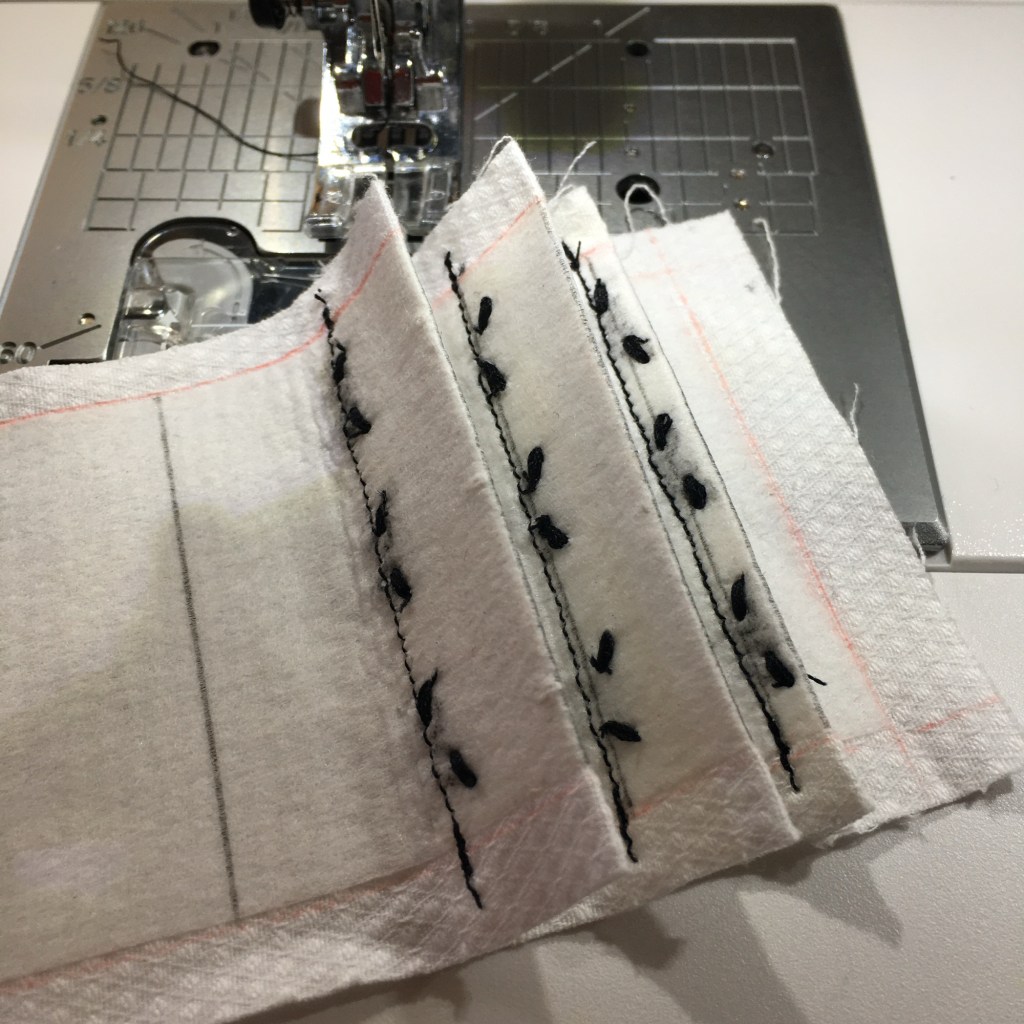
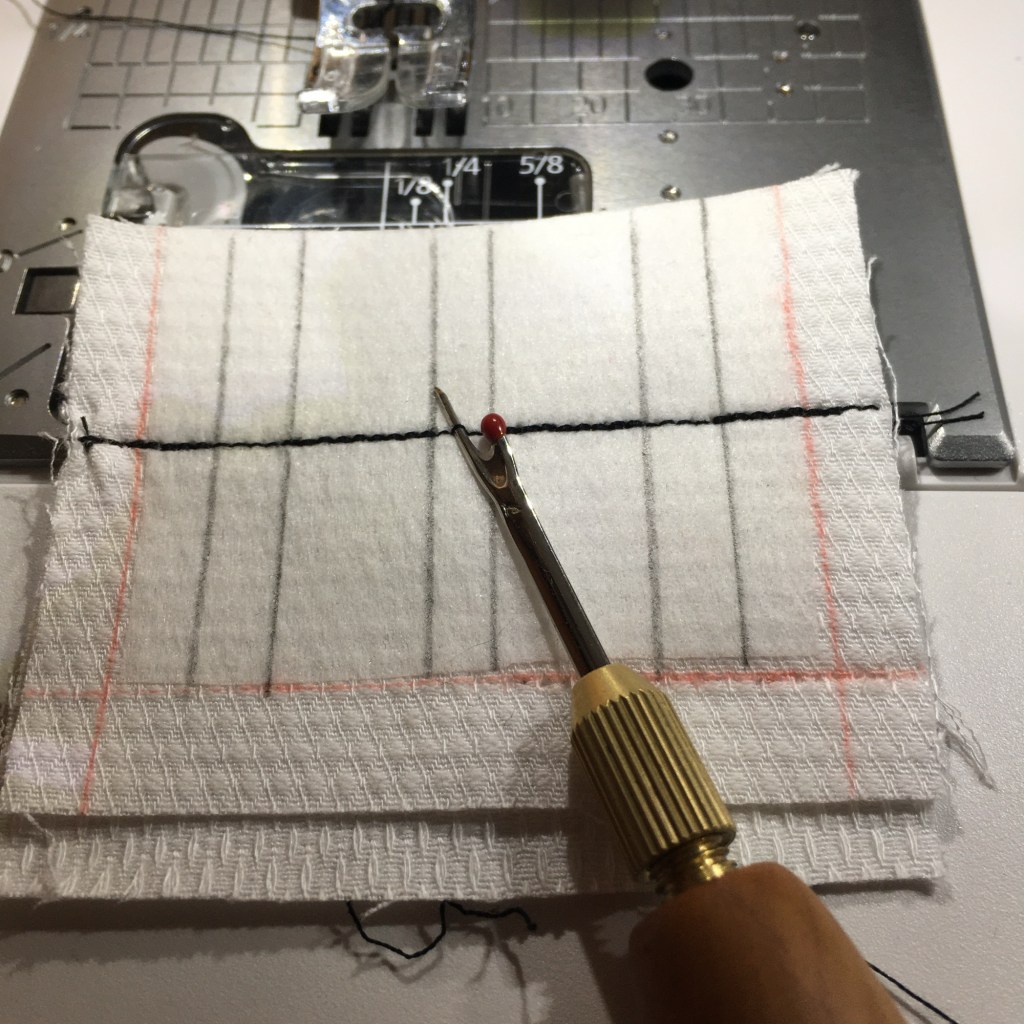
Close the pocket so the eyes are now encased. We are now going to secure the eyes in the pocket using the button foot, but before we do this we need to locate where the eyes are so we can get the stitching in the right position. This is the reason for the white interfacing as we are going to use the same technique as used in brass rubbing to indicate the location of the eyes. We are only going to be sewing through the pocket fabric, so no stitches are visible on the completed piece, so with the main piece folded in half lightly move the pencil, using the side of the lead, over the area where the eyes are. Et voilà, the location of the eyes are revealed.

Now you can place the fabric under the button foot with the position of the eye known. Ensure that the second stitch is within the fold and secure the eyes in place (2 secure points for each eye). Repeat this for all 3 pockets, so 9 eyes secured in total.
The next stage of securing the eyes is to change back to your standard foot and set your machine to a shorter stitch (I use 1.6) and add a line of stitching midway through the fold to further secure the eyes in place. I walk the machine over the positions where the eyes are to avoid the needle hitting the metal. If the needle is going to hit an eye I will position the needle slightly back and I find this is sufficient for the next stitch to avoid the metal of the eye. Moving the needle back also ensures that the stitches stay short and more secure.
Then finally, top stitch the pocket closed as close to the edge as possible. When you do this you will be securing the pockets to the pocket above to increase the rigidity.
When this is done fold the short edge seam allowances of 3/8” to the wrong side and press or as I have recently discovered when using a more slippery fabric using as piece of double sided 1/4″ quilters tape to hold in place makes sewing it to the bra so much easier, so that is what I am going to do in future. Fold the fabric in half, this should be at the final line on the interfacing, and sew the side seams together. Once again I found using the quilters tape so useful here too as it holds everything in place when sewing, which is difficult on such small pieces.

Turn right side out and press. The main “eye” piece is now complete.

Making the Hook Piece
To create the hook piece, I have come up with a little sewing technique which helps produce a secure seam along with the holes required for the hooks to sit in.
The diagram for the stitching has been expanded to show the path easier.

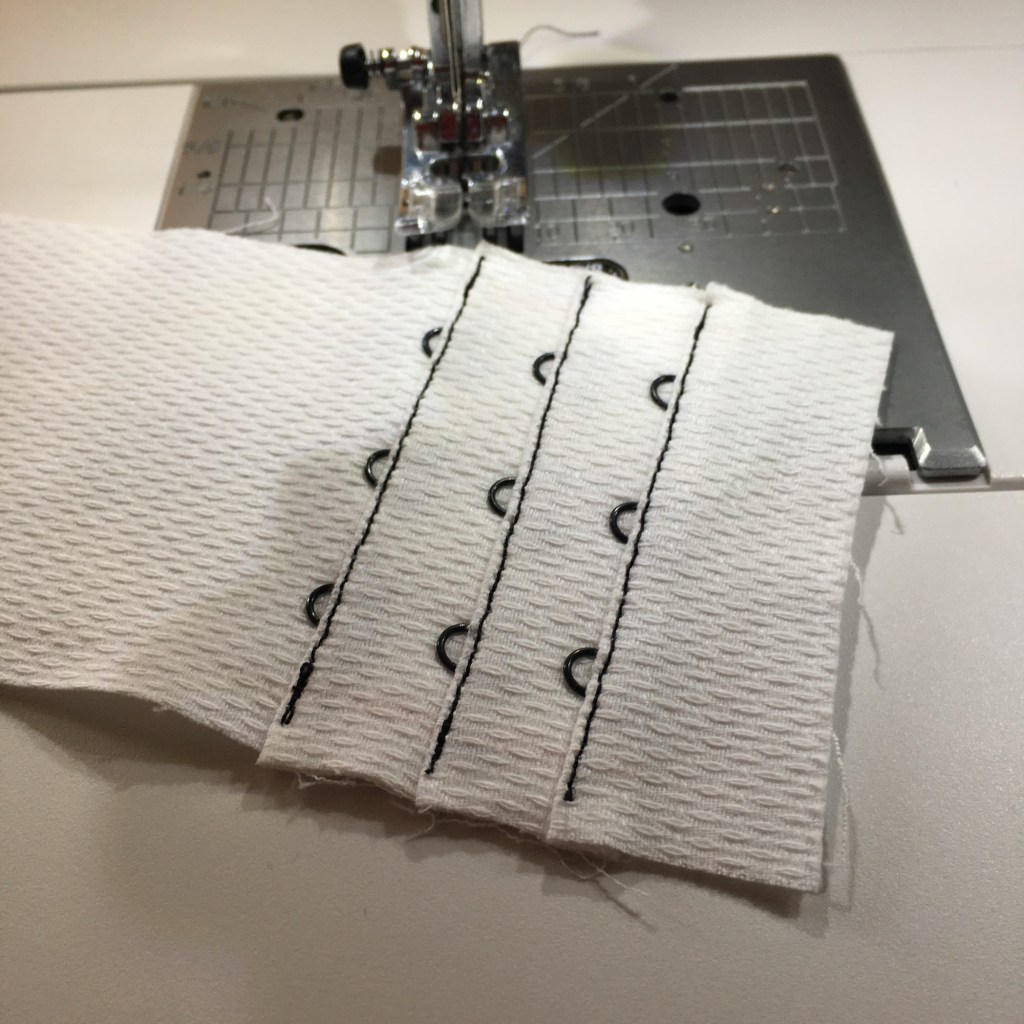
Starting at the edge sew to the 1st mark. Reverse back to the edge. Sew to the 3rd mark. Reverse back to the 2nd mark. Sew to the 5th mark. Reverse back to the 4th mark. Sew to the edge. Reverse to the 6th mark. Sew to the edge.
Now to create the holes for the hooks where there is only one row of stitching snip the thread of one stitch on one side only. This is sufficient to create a hole big enough for the hook to be passed through.
When the hooks are passed through the gap the hooks need to rest on the inside piece. Fold the fabric over the hooks to expose the top seam allowance. A pin can be used to keep this out of the way. Attach the hooks to the seam allowance using the same method used to attach the eyes. Use a pencil to indicate the position of the fixing eyes and the button foot to stitch, however this time set the stitches at right angles to anchor them against the pull on the hooks. Due to the hooks being being proud of the fabric, the standard sewing foot cannot get the stitching line as close as needed when doing the second securing row. So to complete the stitching to secure the hooks the zipper foot is used.
I complete the stitching with the needle moved as far over to the right as it goes and stitch as before with a 1.6 stitch length.

Then to double secure the hooks in place as a lot of pressure will be placed on these hooks, use the zipper foot to sew a line of top stitching in between the hooks. To create a firm line of stitching I sew up to the hooks and then reverse back. Sewing up to the end hooks is not an issue as the back of the foot is out of the way and the stitching line can go from the edge of the fabric to the hook and then be reversed back to the edge. For the spaces in between the hooks I begin the stitching in the middle, sew to the hook, reverse to the previous hook then stitch forward to the hook again. This produces a firm secure seam. While sewing in between the hooks the back of the foot will be balanced on top of the back hook. UPDATE: I have started using the lock stitch function on my machine at the start and end of the stitching between the hooks as this is a lot easier and less problematic than the back stitching.

When this is done fold the seam allowances of 3/8” to the wrong side ensuring it is over (not under) the top seam allowance and press or as I now do secure in place with quilters tape. Fold the fabric in half, right sides together, so that the ends meet. This will leave a 1/8” overhang of the front piece at the top. Sew the side seams together using quilters tape to secure in place before sewing if you prefer, turn right side out and press. The hook piece is now complete.


So now it is up to you, if you want to, to make this technique your own. Change what does not work for you, adapt it to how you want or need it to be. Take your own version to the next level. One idea I had was to colour the hooks and eyes, maybe a spray paint or possibly gel nail varnish?, to match or contrast with the fabric, I have only found them readily available in black, white or silver. Maybe use large statement hooks and eyes, possibly corset hooks, which may also be good for anyone with dexterity problems. If you would prefer 4, 5, or more hooks so that it is longer, the basics are there to expand the pattern. Just enjoy your sewing and make what is best for you.

Could this be adapted to make bra extenders by having hooks at one end and eyes at the other?
LikeLiked by 1 person
Yes it could. The eye piece would not have its back piece included but would extend to incorporate the back of the hooks. The hook piece would extend to cover the eye piece and you would then have an open end at the end of the eyes to top stitch. Does that make sense?
LikeLike