
I am going to start by saying I am fascinated by zero waste patterns. As a sewing community we need to take greater responsibility for the creation of fabric waste. However, I do struggle with the concept slightly. The majority of the early patterns used large quantities of fabric to enable the addition of shaping without darts, large seam allowances, pockets, strange facings and flounces added, just to use up spare fabric and shaping that while looking amazing on some would make me feel very uncomfortable. Along with this, specific widths of fabric are required by some patterns that are not available commercially, so cutting fabric down to size could mean you had failed in your zero waste challenge before you had even started.
Maybe we are being too hard on ourselves and like a New Years resolution we are setting ourselves up to fail. Instead of concentrating on zero waste should we be concentrating on minimal waste, and as a side line items that can be created from the minimal waste that is left?
Excitingly, for me, there are now some more of what I would describe as “classical” patterns being designed which are starting to pique my interest and as a trouser wearer decided that my first attempt at a Zero Waste Pattern would be the Milan AV-JC 001 High Waisted Trousers available through Zero Waste Design Online.
These trousers looked comfortable and suited my style and wearability criteria. I was not too keen on the pleats and belt in the design and thought an elasticated waist would work as well so decided to try it out.
Firstly, and I do feel like a bit of a moaning mini here, I felt that the size of the pattern and the paper required to print it out was excessive. There are 40 pages to print for my size and the left and right sides are printed separately so the layout for all the additional pieces can be seen.

This may be because I am a more experienced sewer, but I felt that all that was needed was the top half of the trouser with the crotch shaping, or even just the crotch shape would do. This along with instructions for the positioning of the pattern piece on the fabric and dimensions for all the other pieces required would have been ample, as all the other pieces are rectangular. Also, this pattern layout meant the fabric was cut as a single layer, so for me that was a minimum of 148cm wide. My cutting table is about half that width and I think I would struggle to find that amount of clear floor space too.
As I normally do, I started out with a toile and I only printed pages 1-4 and 9-12 of my pattern size, so I had one trouser leg from the waist down to just under the crotch shaping plus part of the belt and belt loops. This was a must do stage for me as not only was I just above the maximum size available (106cm hip) but I am very aware that I am my own unique shape when it comes to my bottom. Just a quick note on the sizing on this pattern – this is an open source pattern for which a donation can be made towards further development and increasing the inclusivity. A note on this pattern in the sizing section states that they aim to revise this pattern and develop a wider size range hopefully in 2022 and are asking If anyone is interested in getting involved in pattern or fit testing to contact them.
The toile was a good move as the trousers were a bit tight on the hips. However, the fabric I had for them was 154cm wide, so that extra 1.5cm on each seam and reducing the seam allowance from 1.5cm down to .6cm (the minimum I set my overlocker to with two needles) resolved that problem. Also, as normal, the bottom shaping was too tight and also too short. This was sorted with a couple of quick adjustments and as I had just created a trouser block for myself I compared the two curves and I was delighted at how close they were to each other.
I would like to make one point about width of fabric at this point. I made a pair of these trousers using the full width of a fabric that was 182cm wide and they did not work at all. There was far too much fabric around the hips, which was not flattering at all and I ended up removing around 20cm of fabric from the seams.
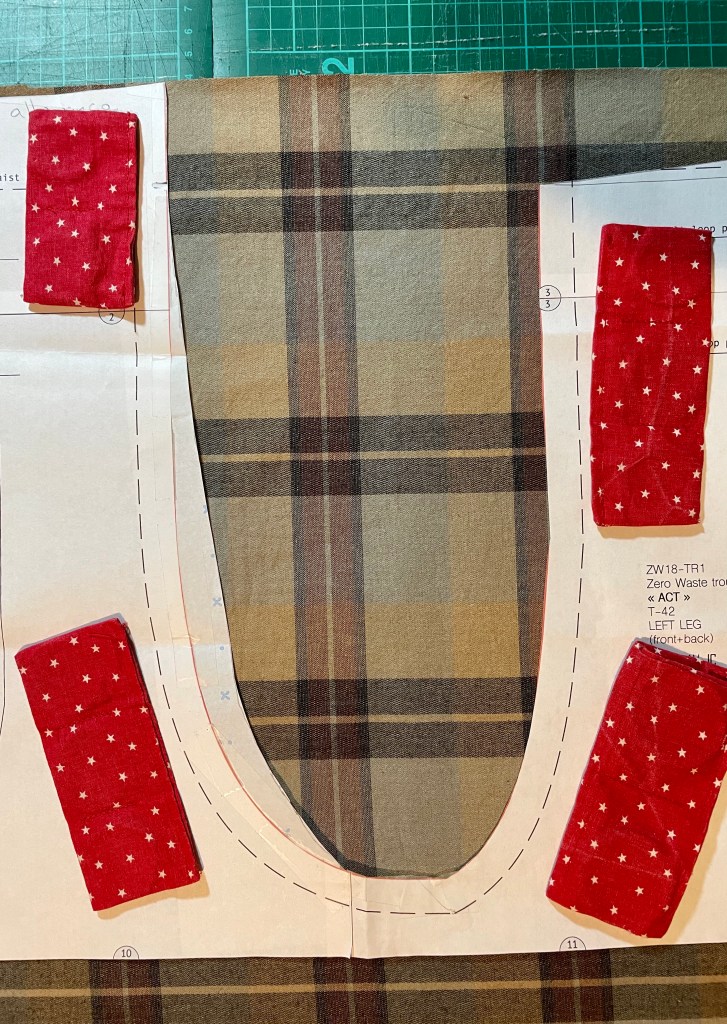

The final aspect of this pattern that needed adjustment was the high waist. As I was changing it to an elasticated waist I did not need all the additional length that had been included in the pattern. As you can see below each of the seams needed to be adjusted by a different amount for my fit. This is where I lost the zero waste aspect of the pattern, but for me the good fit was worth the small amount of fabric that was removed.
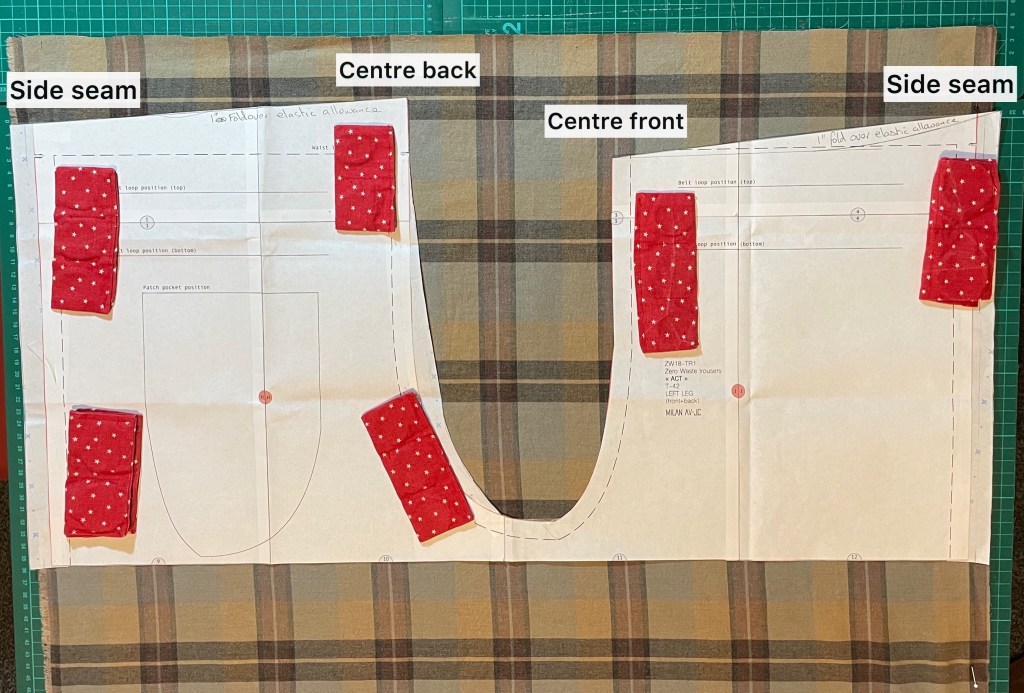

I have, however, despite my dislike of pockets, embraced the use of the fabric removed to create the crotch curve and added the pockets to the back of the trousers. They will rarely be used as pockets but I have found them to be useful to identify the back when putting them on. Something I have also considered, but not tried yet, is using the fabric to make in-seam pockets. This is definitely something I will try next and I will explain why later.
The fabric remaining for the pockets is fairly long, so to make it a better pocket size three horizontal pleats are added. Depending on the fabric you are using I think you can have fun with the pattern by playing with the placing of the pleats. The pleats as per the original pattern are placed so that the curve remains fairly smooth. Because I have changed the shaping to suit my fitting needs that has been changed slightly, but if you do play around with the pleats, especially further down the pocket, you will find you will loose the smooth curve completely. However, as I always say, this is your garment and you do whatever makes you happy.

The pattern instructions have you top stitching the hem of the pockets but only tacking the pleats at the sides to keep them in place when you are sewing them on to the trousers. I prefer top stitching the pleats too, keeping them fully in place. Once your pockets are completed the next step is to attach them to the back of the trousers. This is done before any other construction is done as it is just so much easier to do.
After this point I continue to construct my trousers in a slightly different order to the instructions. Instead of sewing the side seams then the crutch curve, I find it much easier to sew the crutch curve then the side seams. For the crutch curve, I over lock on the edge of the fabric, so there is no waste. This reduces my seam allowance from 1.5cm to 0.6cm, but am happy with the extra fabric adding a little looseness to the seat.

For my sizing the side seams need to have as much fabric as possible so is also over locked at the edge of the fabric so no fabric is lost.

From here I add an elasticated waistband using my normal method and then a double fold hem and the trousers are complete.
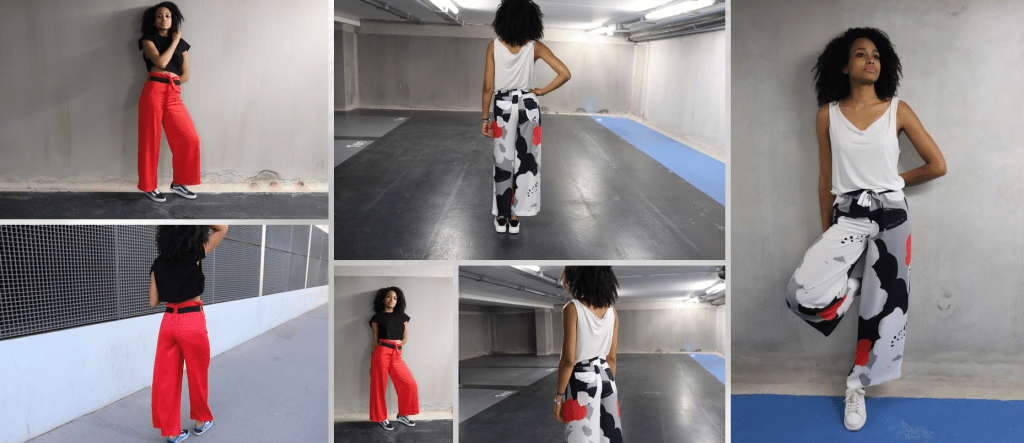
Now that I have made three pairs of these trousers, I have a good idea on what I think of the pattern. I definitely do not think the larger size gives the same profile as the image. I think that the more structured fabrics, as in the cotton and brushed cotton I have used in two of the samples, does not give as good a result for me as the more drapey wool crepe version.
The main area I have an issue with is the back view.

As you can see on the cotton versions the hang at the back is not brilliant but seems not to be an issue on the wool crepe. I am not sure whether the hang at the back of the cotton is affected by the pockets and when I make another pair, the brushed cotton pair were made as pyjama bottoms and I have fabric for a second pair, I will leave the pockets off to see if that helps.

Though the front has a very casual style, this is not an issue and I think the fit looks ok. Once again I think there is a noticeable difference between the cotton and the wool crepe but nothing that makes the trousers look wrong.

The side view of the trousers looks good and hangs ok. I still think that the pockets do cause an issue with how they hang and as I have already said I will be making my next pair without adding the back pocket and may try out adding an inseam pocket. I also thought you would be interested to see the trousers without my t-shirt covering the waistband. I did reduce the back rise on the pyjamas bottoms by 2.5cm as I thought the previous pairs came too far up my back. I will be adding that back on to the pattern as I found them less comfortable with the lower rise.

And this is where I found the lower back rise the most uncomfortable. The extra 2.5cm just ensured that the waistband sat comfortably on the lower back and didn’t, slide down. Another point on these trousers for those of you that have a sensitivity to inner leg seams, this pattern does not have one.
So, am I a convert to Zero waste patterns, yes and no.
I am delighted I tried this pattern as I think I have made a wearable pair of trousers from 112cm of 154cm wide fabric. I will definitely make more pyjama bottoms from it, once again as it only needs 112cm of fabric and they are so comfortable.
I am also going to make a pair in a chiffon type crepe in my stash for a lightweight drapey summer trouser. However, this fabric is only 100cm wide so will not be zero waste by any means, but I will find something to make with the off-cuts.
I hope you have found this interesting and maybe given you pointers to trying to make a zero waste pattern yourself. Do let me know.

very interesting, will have a go at some point as I have a book on this subject
New_vintage_sewing
LikeLiked by 1 person
This was a very early pattern so relatively simple, there are some really clever ones out there now that are worth looking in to.
LikeLike